|
|
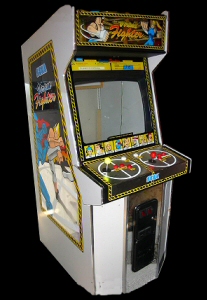
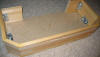
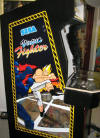
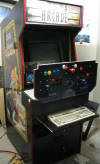
Okay, Here we see the first glimpse of a brand spankin new
(used) cabinet in the shop. This one I'm hoping to use as
a two player cabinet. I have a client interested in a
cabinet, and this one might just do well for him, we'll have to
wait and see! I'd really like to keep the sideart intact
on this one, although the glass, control panel and marquee will
change (I always like to leave them reverse-convertable).
One problem is the front panel, it's either been kicked or
dropped, as it is all caved in on the inside. I'll have to
replace it.
|
|
|
|
20" IBM/Trinitron monitor for this one, and a 2 player setup
with trackball and a spiffy new Vortex spinner. Should look nice
when done! |
|
|
|
|
|
|
| |
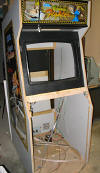 |
The front of
the cabinet is carefully removed. Actually, it was removed after
I had a few shots of 150 proof rum, so there was nothing careful
about it. Sawzall made quick work of the front panel.
Sure glad I don't consider the virtua series a classic cab :) |
|
| |
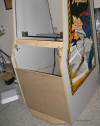 |
I cut a new
front piece for the cab. I need to rout out the coindoor
area and mount it securely back into the cab. I might wait
till the control panel box is done, so that I know what I need
to do to secure the panel and still have clearance for the
keyboard drawer.
|
|
| |
|
|
|
| |
|
|
|
| |
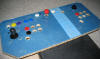 |
Some progress
made. I'm going to install what controls I have, and build
the base to this. Artwork will have to wait until the
panel is done so I can place a few labels.
|
|
| |
 |
Base of the
panel is together. Just need to sand, prime and paint.
Then figure out how to mount this to the cabinet! |
|
| |
 |
The complete
unit minus sanding, t-molding, trackball and a few of the
buttons. While I wait for the trackball, I'll start
looking at mounting that monitor and designing graphics for the
panel, the marquee and the bezel instruction card. |
|
| |
|
|
|
| |
 |
The panel
hangs out a bit too much since the front of the cabinet has been
recessed. I'm going to have to do a bit more modification
than I originally thought to make this one look right. The
monitor bezel will be mounted at a different angle. and the
panel set farther in. Cabinet will get a coat of black
around the sideart to get rid of the gray paint and
imperfections in the sides.
|
|
| |
 |
Got it
re-seated. Now to make it all look right. Maybe
tomorrow the T-molding will show! |
|
| |
|
|
|
| |
 |
Fast forward
a couple of days, and I have the sides painted, and have started
to move the mounting hardware for the bezel. T-molding
finally showed, so I will get the router out and gut the groves
for it on the front where I reshaped the cabinet. It
actually looks pretty good in black! Graphics are still in
the "don't like this don't like that" stage, so the panel has
been delayed a bit, but the new owner wants it just right! |
|
| |
 |
Okay!
Gfx are finalized, and going into the printer after the weekend,
the T-molding is in, the marquee light is wired up, and the
front panel is secure. While I'm waiting for the printer
to do his thing, I'm going to mount the coin door and look at
getting the keyboard drawer installed (the gap under the control
panel). The red goes so nicely with the black, and
considering the original sideart was saved, this cabinet is
coming out quite nicely...just wait till the slick new graphics
go on! :) |
|
| |
|
|
|
| |
|
|
|
| |
 |
Keyboard
drawer, front flip panel and panel mounting points are in, as is
the new mount for the front bezel glass and the coin door.
The panel top needs to be reworked to fit with the new way I
have the panel, but that is minor. The mounting brackets
for the Monitor are ready to go, I just have to make sure of
proper placement of the monitor shelf. I should get the prints
tomorrow and get the finishing paint and wiring on this shortly! |
|
| |
|
|
|
| |
 |
Well I've
done this more times than I'd like to admit. Get the damn
plexi cut and on the last bit, ruin it. Damn damn damn,
back to home depot for some more and redo the entire piece! |
|
| |
 |
The marquee
is awesome. Couldn't ask for better on that! |
|
| |
 |
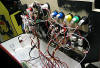
Okay, the new
plexi is in, I laid down the underlay and installed the
controls. Except for the wiring, this panel is in the done
books. |
|
| |
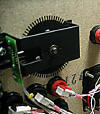 |
The Vortex
spinner went in easier than any other spinner I have installed.
One drill hole, and two screws and it was in! No wonder I
keep these things in stock here! |
|
| |
 |
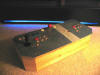
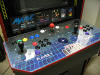
Whew!
Wiring be hard! All in there, but only partly tested.
Here you can see the trackball, buttons Happ supers, Wico
leafswitch stick and the Oscar Vortex. You can also almost
see the I-pac and Opti-pac! |
|
| |
|
|
|
| |
 |
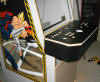
Nice shot
with the hood up and the trolly out. The keyboard drawer
stays secure with a barrel lock, and makes it look like part of
a commercial cab. All that's left is to install the power
switch and startup button and wire up the coin slots. Whoo
hoo! |
|
| |
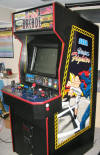 |
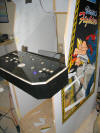
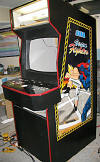
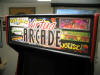
There's the
beauty shot. Probably the best looking two player cab I've
made yet. Not being egotistical of course, just stating
the obvious ;) Kinda wish this one was staying here, I'm
starting to yearn for my own cab again. Two more before I
can work on my own. I'd complain, but damn I just love
making these things for people. |
|